Bunny Cake With Round Cake Pans Recipes: Easy Steps and Decorating Tips
Shaped cakes have been a part of baking traditions for centuries. Ancient Egyptians baked bread in molds to create different shapes, making celebrations and rituals more festive. By the Middle Ages, European bakers began crafting intricate designs for royal events. The 20th century saw the rise of shaped cake pans, making it easier for home bakers to create themed cakes. Today, shaped cakes are common for birthdays, weddings, and holidays.
The Bunny Cake Tradition
The bunny cake tradition is closely linked with Easter celebrations. These cakes symbolize new beginnings and the arrival of spring, making them popular for Easter gatherings. The bunny cake gained popularity in the mid-20th century when homemakers sought festive, easy-to-make desserts. Using round cake pans, they creatively fashioned cakes into bunny shapes, allowing for personalization with different frostings and decorations. Today, bunny cakes continue to be a favorite, enjoyed by families and friends during Easter celebrations and beyond.
Essential Tools for Bunny Cake
Choosing the Right Round Cake Pans
Selecting the best round cake pans ensures an even bake for your bunny cake. Choose non-stick pans for easy cake removal. Opt for 8-inch or 9-inch pans. These sizes create the optimal cake layers for carving and assembling. Heavy-duty aluminum pans distribute heat evenly and prevent warping.
Additional Decorating Tools
Decorating tools bring your bunny cake to life.
- Offset Spatula: Smooths frosting layers and spreads it evenly.
- Piping Bags and Tips: Designs details like bunny ears, whiskers, and eyes.
- Fondant: Adds a professional finish to details. It’s moldable for creating shapes like a bunny nose.
- Gel Food Coloring: Colors the frosting without altering its consistency.
- Cake Stand: Facilitates easy frosting and decorating by elevating the cake.
Equip yourself with these tools to create a delightful and charming bunny cake using round cake pans.
Preparing the Cake Batter
Ingredients You’ll Need
Gathering the right ingredients ensures your bunny cake has the perfect texture and flavor. You’ll need:
- 2 1/2 cups of all-purpose flour
- 2 1/2 teaspoons of baking powder
- 1/2 teaspoon of salt
- 2 large eggs
- 1 1/2 cups of granulated sugar
- 1 cup of whole milk
- 1/2 cup of unsalted butter (softened)
- 2 teaspoons of vanilla extract
Each component plays a crucial role in achieving the desired consistency and taste for your bunny cake.
- Preheat and Prepare Pans: Set your oven to 350°F (175°C). Grease two 8-inch round cake pans, then line the bottoms with parchment paper to ensure easy removal.
- Mix Dry Ingredients: In a medium bowl, whisk together flour, baking powder, and salt. This mixture needs to be well combined for an even rise.
- Beat Butter and Sugar: In a large bowl, using an electric mixer, beat the softened butter and sugar on medium speed until light and fluffy. This process should take about 3-4 minutes.
- Add Eggs and Vanilla: Mix in the eggs one at a time, beating well after each addition. Add the vanilla extract and continue to beat until combined.
- Combine Dry and Wet Ingredients: Gradually add the dry ingredients to the butter mixture, alternating with the milk. Begin and end with the dry ingredients, mixing until just combined.
- Divide Batter and Bake: Pour the batter evenly into the prepared round cake pans. Tap the pans lightly on the counter to release air bubbles. Bake for 25-30 minutes, or until a toothpick inserted into the center comes out clean.
- Cool Cakes: Allow the cakes to cool in the pans for 10 minutes. Then, transfer the cakes to wire racks to cool completely before frosting and assembling your bunny cake.
These steps ensure a smooth and lump-free batter, which is essential for creating a fluffy and delicious bunny cake.
Assembling the Bunny Cake
Cutting the Round Cakes into Bunny Shapes
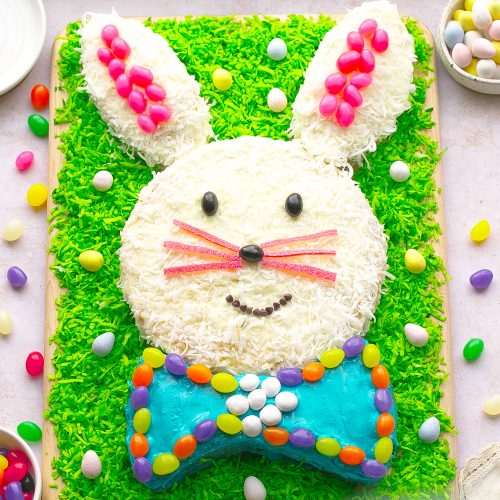
First, ensure the round cakes have completely cooled. Use a serrated knife for clean, precise cuts. Start by placing one round cake in front of you and slicing off two ears from each side, leaving a middle section that will form the face. For example, cut in a semi-circle to form large, rounded ears. Take the second round cake, and cut two smaller oval shapes to form cheeks for the bunny face. To enhance symmetry, measure the proportions of each cut before slicing.
Tips for Assembling Without Breakage
Start with a sturdy cake board to prevent movement while assembling. Position the face of the bunny on the board and attach the ears and cheeks using a small amount of frosting as an adhesive. For stability, use wooden dowels to secure the ears if they are larger. Spread an even layer of frosting over the entire cake, ensuring it reaches the edges to cover any gaps. If a piece breaks, use extra frosting to reattach it; a chilled cake is less prone to breakage.
Decorating Your Bunny Cake
Creative Ideas for Frosting and Decorations
Frosting transforms your bunny cake from simple to spectacular. First, choose a base color for the bunny, typically white or pale pink. Use buttercream or cream cheese frosting for a smooth finish. Food coloring can help you achieve the exact shades you desire.
Use candies, frosting details, or both to create the bunny’s features. Licorice strings work well for whiskers, and mini marshmallows can represent a fluffy tail. Jelly beans or M&M’s make colorful eyes and noses. For added texture, consider coconut flakes sprinkled over the frosting to mimic fur.
If your bunny cake needs a creative twist, add themed decorations like edible flowers or a bowtie made from fruit leather. Seasonal elements, such as pastel-colored candies or edible Easter eggs, enhance the festive feel.
Techniques for Smooth and Artistic Frosting
Before applying frosting, ensure the cake is cool to prevent melting and uneven spread. Start with a crumb coat, applying a thin layer of frosting to seal the cake’s surface. Chill the cake for 30 minutes; this step helps the final layer adhere better and look smoother.
For a smooth finish, use an offset spatula or bench scraper. Spread the frosting in even strokes around the cake and on top. Dip your spatula in warm water, shaking off excess water, to achieve a polished surface.
To create artistic designs, opt for piping techniques. Fill piping bags with different colors and use various tips to craft floral patterns, lace-like details, or basket weaves. Practice on a separate surface to perfect your designs before applying them to the cake.
Adding glitter or colored sugar enhances the bunny cake’s visual appeal. Use stencils if you want precise patterns or themed shapes. Press the stencil gently against the cake, then sprinkle colored sugar for a neat, professional look.
Anchor your cake on a decorative cake board to facilitate handling and serving, keeping its design pristine.
Conclusion
Crafting a bunny cake with round cake pans is a delightful way to bring creativity and joy to any occasion. With the right tools and a bit of imagination, you can transform simple ingredients into a charming centerpiece that’s sure to impress. From selecting the perfect pans to mastering the assembly and decoration, each step contributes to a stunning and delicious dessert. Whether you’re celebrating Easter or just looking to add some fun to your baking, a bunny cake is a wonderful project that combines tradition with a personal touch. Enjoy the process and let your creativity shine!