Boiled Eggs: Step-by-Step Guide for Easy Peeling and Ideal Yolks
Fresh eggs are often harder to peel after boiling. The egg whites stick to the shell, making it difficult to achieve clean peeling. If you plan to boil eggs, older eggs are more suitable. Older eggs have a more alkaline environment, which allows the shell to separate from the egg white more easily. You can determine an egg’s freshness by submerging it in water. Fresh eggs sink to the bottom and lie flat, while older eggs stand upright or float.
Best Breeds for Hard Boiling
Different chicken breeds produce eggs with varying shell thicknesses and flavors. White Leghorn hens, known for their large, white eggs, offer thin shells, making them easier to peel after boiling. Rhode Island Red and Plymouth Rock hens produce brown eggs with thicker shells. These breeds are suitable if you’re looking for a more robust egg flavor. Both types of eggs can be prepared as hard-boiled, but personal preference will determine the best choice for your needs.
Tools and Equipment Needed
Suitable Pots for Boiling
A medium-sized pot, preferably made of stainless steel, works best. Ensure the pot can hold enough water to fully submerge the eggs. For instance, an 8-quart pot can generally hold a dozen eggs comfortably. The pot’s material should allow even heat distribution, which helps in cooking the eggs uniformly. Avoid using nonstick pots as they may not heat as evenly and could potentially leave hot spots.
Egg Timers and Their Accuracy
Digital egg timers provide precise timing. These timers offer settings that range from soft to hard boils. An example is the Habor Digital Kitchen Timer, known for its accuracy. Alternatively, traditional hourglass timers can serve the purpose, but they’re less precise compared to digital ones. Using a digital timer ensures that you replicate the perfect doneness each time, maintaining consistency in your hard-boiled eggs.
The Cooking Process
Step-by-Step Guide to Boiling
- Preparation:
- Arrange eggs in a single layer in your medium-sized stainless steel pot.
- Fill the pot with cold water until it covers the eggs by at least 1 inch.
- Add a pinch of salt to the water to help prevent cracking.
- Heating:
- Place the pot on the burner and set the heat to medium-high.
- Bring the water to a rolling boil.
- Timing:
- Once boiling, reduce the heat to low and cover the pot.
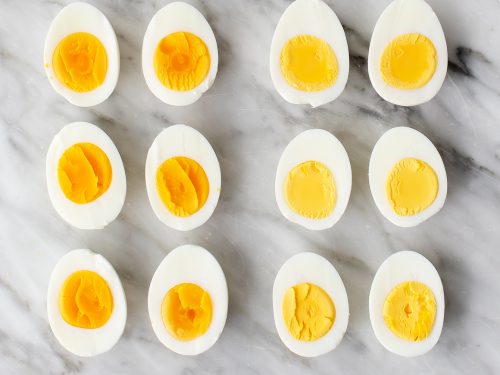
- Set your digital egg timer for 9 to 12 minutes, depending on your desired yolk firmness.
- Cooling:
- Immediately transfer the eggs to a bowl of ice water using a slotted spoon.
- Let them cool for at least 5 minutes to stop further cooking.
- Peeling:
- Gently tap the eggs on a hard surface to crack the shell.
- Roll the egg to loosen the shell, then peel under running water for ease.
- Overcrowding the Pot: Crowding increases the chance of uneven cooking. Use a larger pot if boiling more than a dozen eggs.
- Starting with Hot Water: Cold water slowly raises the temp, reducing the chance of cracking and ensuring even cooking.
- Skipping the Ice Bath: A rapid cool-down stops cooking and makes peeling easier. Don’t skip this step if you want perfect results.
- Not Timing Precisely: Over or undercooking leads to undesirable yolk textures. Use an accurate digital timer.
- Peeling Cold Eggs: Peel eggs soon after cooling. Waiting too long might make the shell harder to remove.
Peeling and Storing Hard Boiled Eggs
Easiest Peeling Techniques
Using easy techniques for peeling ensures smooth results. Start peeling from the wider end, where the air pocket is located. Tap the egg gently on a hard surface to create cracks. Roll the egg between your hands to loosen the shell, then carefully slide your fingers under the shell to remove it.
Using fresh eggs can make peeling harder, while older eggs peel easier due to a higher pH level of the whites. Submerge eggs in ice water immediately after boiling to contract the egg whites from the shell, making peeling less challenging.
Best Practices for Storage
Store hard-boiled eggs properly to maintain safety and quality. Place boiled and peeled eggs in an airtight container to prevent them from absorbing odors from the refrigerator. Mark the storage date on the container to keep track of freshness. Hard-boiled eggs remain safe to eat for up to 7 days when kept refrigerated.
For unpeeled eggs, keep them in the original carton to protect them from damage. Ensure your refrigerator maintains a temperature of 40°F or less to keep the eggs fresh. Avoid storing eggs in the refrigerator door, as the fluctuation in temperature may affect their quality.
Conclusion
Mastering the art of making perfect hard-boiled eggs is simpler than you might think. By following the right steps and paying attention to details like egg selection and peeling techniques, you’ll achieve consistently excellent results. Remember to store your eggs properly to maintain their freshness and quality. With these tips and tricks, you’re well on your way to enjoying perfect hard-boiled eggs every time.


